

Uploading and downloading files are very common features for most web and mobile applications.
But, implementing reliable and scalable upload and download workflows isn’t necessarily easy. You need to take care of storage, and permissions and maintain long-running connections between clients and your server.
If you are using a serverless architecture with API Gateway and Lambda, implementing upload and download functionalities gets even more complicated because you are constrained by strict payload size limits (Lambda request/response payloads are both limited to 6 MB) and time limits (API Gateway will timeout after 29 seconds).
So, how can we implement upload and download functionality in an easy yet reliable way on AWS?
The simple answer is to use S3 and leverage S3 pre-signed URLs. In this article, we will discuss in great detail what pre-signed URLs are, how to use them, and some best practices to keep in mind.
Use cases
Before getting into the nitty-gritty details of S3 pre-signed URLs, let’s discuss some potential use cases:
- You have a signup in a mobile application where people can take a photo for their avatar. To support this use case you would need to implement an endpoint that allows the mobile app to upload the picture.
- You are building an App store platform. On this site, users who have purchased a license for a given software can download the installer binary. In this case, installers can reach multiple hundreds of megabytes. If we are talking about games, we can easily get to binaries in the order of gigabytes in size. In this scenario, you’ll need to allow app developers to upload large binaries and users to download them.
- You are implementing a cloud-based document management platform. Users can upload their files and keep them stored in the cloud. They should also be able to download their file whenever they want to access them. You need to manage the upload and download of documents and access control to make sure that users can only access their own files.
- You are implementing the backend for a marketing campaign. You are creating a landing page with an incentive: users who fill up a subscription form or a newsletter will receive a confirmation email with a link to download a whitepaper. You need to make sure the download link is somewhat secure and that it will expire after some time.
- You are creating an inter-system communication workflow where different components need to exchange large files. You prefer to use asynchronous event-based communication, but you don’t put a large payload in the message. Instead, you provide a URL to an attachment that the receiving system will need to download.
It should be quite clear at this point that, all these use cases, while relatively common, will require some significant engineering effort to be implemented correctly. Most of the complexity lies in the storage layer, so let’s see how pre-signed URLs can make our life easier.
Enter S3 pre-signed URLs
S3 (Amazon Simple Storage Service), is an object storage service that offers great scalability, data availability, and a bunch of other cool but lesser-known features. Among these features, we have pre-signed URLs.
S3 is an ideal service when you need to store and serve files for all sorts of applications. Pre-signed URLs make it easy to allow various clients to upload and download files in a simple yet controlled manner.
By default, all the objects in an S3 bucket are private. You need to have proper credentials and use the AWS CLI or the AWS SDK to programmatically add new objects to a bucket or retrieve the content of an object from a given bucket. Of course, there needs to be a policy that allows your credentials to perform these actions on the given S3 bucket.
This approach works quite well for applications that need to interact with S3 on a regular basis. You can easily define IAM policies to give fine-grained permission to the application so that it can read and write objects in S3 in a controlled way.
But when it comes to giving temporary access to a user or a third-party service, having to rely on credentials or the SDK can be highly impractical and, in some cases, even unfeasible.
Let’s think again about the newsletter example. We want to send a link through an email that gives limited access to an object to a receiver. We cannot expect a random person receiving the email to have valid credentials to access an object in our S3 bucket. We need instead to create a “specially crafted” URL that gives the receiver temporary access to that resource.
This is exactly what S3 pre-signed URLs are: specially crafted S3 URLs with embedded credentials and time-limited availability.
Your app can generate pre-signed URLs every time you want to allow an arbitrary party to perform an upload or a download of an S3 object by simply using the HTTP protocol and without having to know anything about S3 or the AWS authentication protocols.
Upload example
Let’s look at an illustration to understand at a high level how S3 pre-signed URLs can be used for uploading objects in a bucket.
STEP 1: A user communicates to the server that they intend to upload a file.

STEP 2: The server recognizes the user and assesses that the user is authorized to perform the upload. Then the server uses its own credentials to generate an S3 pre-signed URL for uploading an object with a predetermined name into a given S3 bucket.

STEP 3: The user receives the pre-signed URL from the server.
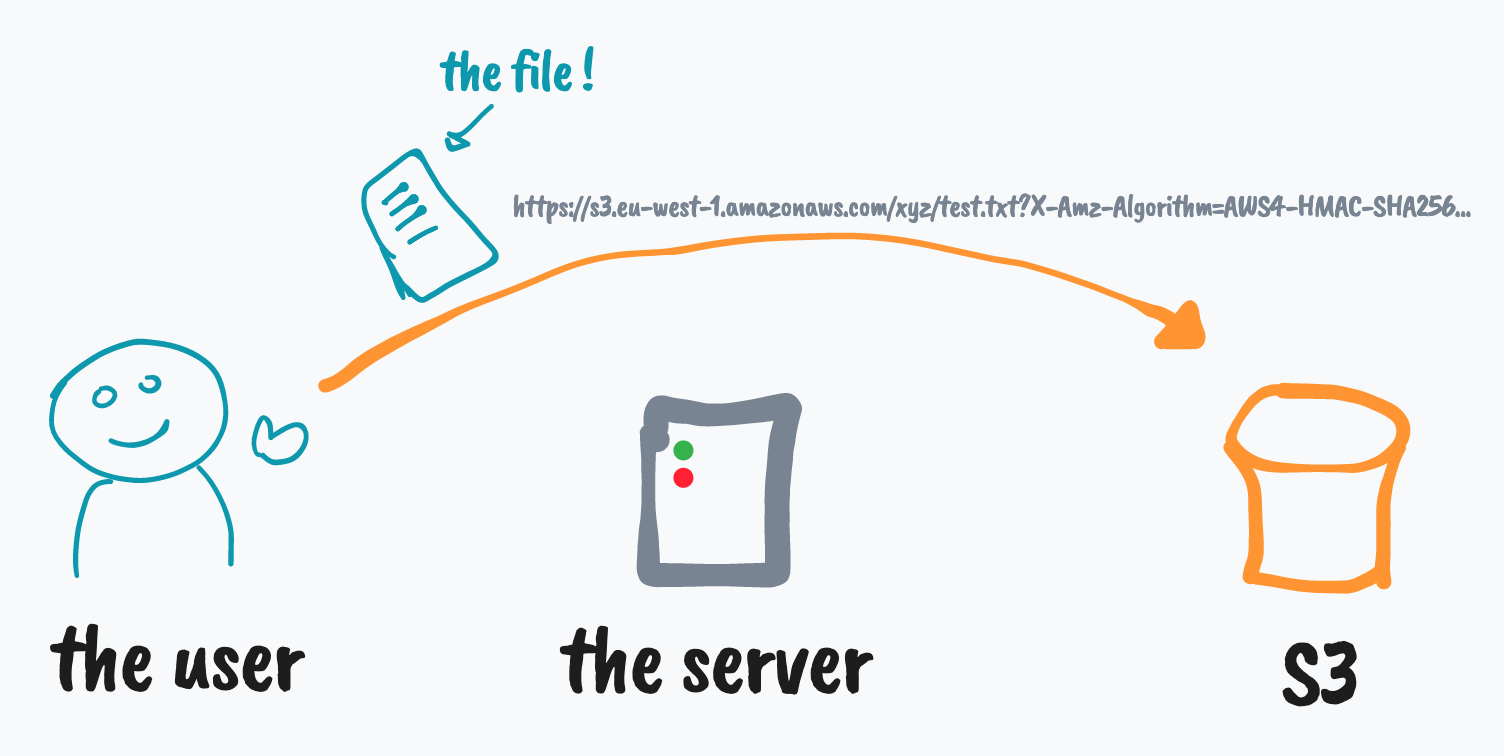
STEP 4: The user makes an HTTP request (PUT or POST) to the received pre-signed URL attaching the file to be uploaded as request payload. Once the request is completed the uploaded file will be available in S3.
Download Example
Let’s see another example that illustrates how pre-signed URLs can instead be used to authorize the download of a given object in S3.
STEP 1: The user requests the server the file myexpenses.csv.

STEP 2: The server recognizes the user and somehow verifies that they can have access to myexpenses.csv. Then the server uses its own credentials to generate an S3 pre-signed URL to get myexpenses.csv.

STEP 3: The user receives the pre-signed URL from the server.

STEP 4: The user makes an HTTP request (GET) to the received pre-signed URL to download the file directly from S3.
Security Considerations
From these illustrations, it’s important to appreciate that the server never talks directly to S3. It can generate the pre-signed URLs autonomously by using its own set of AWS credentials (for example the server could be an EC2 instance with an IAM instance profile). In other words, the server does not need to talk with S3 (or other AWS services) to be able to generate a pre-signed URL.
In general, everyone with valid AWS credentials (Role, User, or Security Token) can generate a pre-signed URL by using the AWS Signature v4 protocol.
For this reason, the URL is validated by AWS at request time (i.e. when a user actually makes an HTTP call with that URL). AWS will consider this request as if it was performed by the entity that generate the pre-signed URL in the first place. So, in our example, if the server is not authorized to perform actions on the given bucket, the user will see a permission error when trying to use the generated URL.

Different kinds of pre-signed URLs
Now that we understand how pre-signed URLs work and how can they be useful in real-life projects, let’s look a little bit more in detail at all the different kinds of pre-signed URLs that we can get from S3.
Get URLs
This is probably the most common kind of pre-signed URL that you will see in the wild. As we discussed before, you can use GET pre-signed URLs to allow a user to download a specific object from an S3 bucket without needing them to have valid AWS credentials or to use the AWS SDK.
One way to generate this kind of URL is by using the AWS CLI. For example, if we have a bucket called finance-department-bucket which contains an object with the key /2022/tax-certificate.pdf, we can create a pre-signed URL to allow a third party to download this file with the following command:
aws s3 presign s3://finance-department-bucket/2022/tax-certificate.pdfIf we run the command above, we should get back a pre-signed URL that looks like the following:
https://s3.amazonaws.com/finance-department-bucket/2022/tax-certificate.pdf?X-Amz-Algorithm=AWS4-HMAC-SHA256&X-Amz-Credential=AKIA3SGQVQG7FGA6KKA6%2F20221104%2Fus-east-1%2Fs3%2Faws4_request&X-Amz-Date=20221104T140227Z&X-Amz-Expires=3600&X-Amz-SignedHeaders=host&X-Amz-Signature=b228dbec8c1008c80c162e1210e4503dceead1e4d4751b4d9787314fd6da4d55Now we can give anyone this URL and they will be able to download the given file.
Note that this URL works even if the bucket is not public. This is actually the point of pre-signed URLs: helping you to keep objects private by default and expose them in a limited and controlled way only when necessary.
Let’s quickly decompose the structure of this sample URL to try to understand better what’s going on with it:
- https://s3.amazonaws.com – The base URL for S3 APIs.
- /finance-department-bucket – The name of the bucket.
- /2022/tax-certificate.pdf – The key of the object.
- ?X-Amz-Algorithm=AWS4-HMAC-SHA256 – The signature algorithm being used.
- &X-Amz-Credential=AKIA3SGQXQG7XXXYKKA6%2F20221104%2Fus-east-1%2Fs3%2Faws4_request – The credentials being used for this pre-signed URL. Note that this string contains the Access Key ID (AKIA3SGQXQG7XXXYKKA6), the region (us-east-1), the service (s3), and the type of request (aws4_request). Also, note that the related secret access key is not disclosed (that one remains known only to AWS).
- &X-Amz-Date=20221104T140227Z – The timestamp when the signed URL was generated.
- &X-Amz-Expires=3600 – The offset (in seconds) when this pre-signed URL will expire. This is 1 hour by default, but it can be customized.
- &X-Amz-SignedHeaders=host – The list of HTTP headers that will be used to calculate the signature (by default only the host header).
- &X-Amz-Signature=b228dbec8c1008c80c162e1210e4503dceead1e4d4751b4d9787314fd6da4d55 – The actual signature of the request.
When a user makes a GET request to this URL, AWS will verify a few things:
- That the URL is not expired
- The credentials used to generate the URL are not expired
- The content of the request matches the signature provided in the URL.
The signature check is a very important step and it’s needed to make sure that the request was not forged in any way. For instance, if the user tried to alter the URL by changing the key from `/2022/tax-certificate.pdf` to `/passwords.txt`, AWS can immediately spot that this is not the request that was authorized when the original URL was generated and block the operation with a SignatureDoesNotMatch error:

If the validation of the request succeeds, S3 will start to stream the requested file to the user.
This is how pre-signed URLs are secure: they can only be used to access the specific object they were created for.
It’s important to note that pre-signed URLs cannot be invalidated after they are used (they will only be invalidated when they expire or when the credentials used to generate the URL are expired or invalidated). As such, a user could use a given pre-signed URL multiple times during their validity window.
Put URLs
Pre-signed PUT URLs can be used to authenticate uploads to S3. These are called PUT requests because they are built on top of regular HTTP PUT requests.
A typical PUT request using a pre-signed URL would look like this:
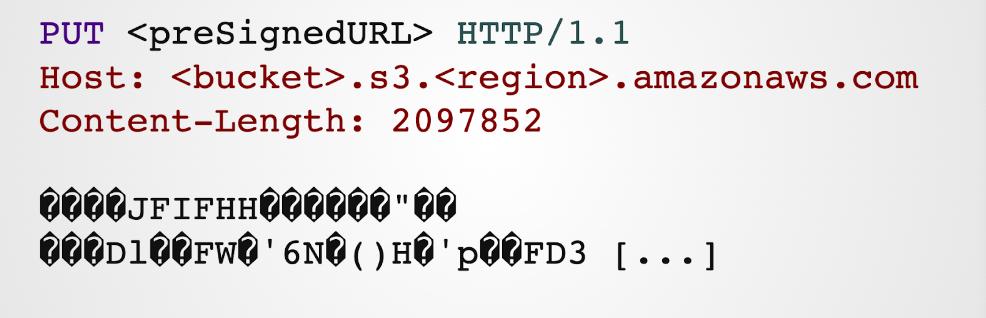
In this example, we are sending a PUT request to the S3 server using the pre-signed URL. We are also passing the Content-Length header which specifies the size of the request body (in bytes). The request body contains the raw bytes of the file we are uploading.
Note that, In this example, we are transferring a JPEG, so we have raw bytes which are not printable (that’s why we see all these weird question marks in a loose UTF-8 representation).
This is probably one of the simplest ways to transfer arbitrary data over HTTP, and that’s why PUT requests are the most common way to upload data to S3 using pre-signed URLs.
Remember that, as per a GET request, the pre-signed URL will contain all the necessary information (signature, expiration date, etc) so that AWS can validate the request before starting to process the uploaded bytes and copying them into S3.
Limitations
Although PUT pre-signed URLs are very easy to use, they also come with some important limitations:
- You cannot set a limit on the upload size (max of 5 GB).
- You can control the metadata, like the Content-Type, but you can limit that to an exact match. This means that you can force the user to send a specific “Content-Type” header such as “image/jpg”, but it cannot be anything more generic (e.g. “image/*”).
These are important limitations that need to be taken into account. Is it acceptable for your applications to have users upload files up to 5GB?
When this is not acceptable, you can fall back to POST pre-signed URLs, which are a bit more complicated but also much more flexible!
Post (a.k.a. Form) URLs
Like the PUT method, the POST method is meant to be used to upload a file directly from a web form into S3.
POST pre-signed URLs use the “multipart/form-data” encoding which is a very common protocol used to serialize the content of web forms that might contain file attachments.
So, the first remark to make is that here we are not really talking about a pre-signed URL, but more about a pre-signed form! In other words, we can’t generate a single URL, but we have to generate an entire web form with different fields.
The POST approach is a lot more flexible than PUT, mainly because it uses a policy mechanism. A policy allows the signer to define “rules” that can control what can be uploaded. For instance, you could provide a range of the supported file sizes (e.g. from 0 to 5Mb) or specify multiple content types (by specifying a prefix such as “image/” to support “image/png” as well as “image/jpeg”).
A typical POST request looks like what’s in the following picture:

If you create a web form using the multipart/form-data encoding method, this is what gets sent behind the scene over HTTP when you hit the “submit” button.
Without getting too much into the weeds of the multipart/form-data serialization protocol, it’s easy to see that here we have different fields (separated by a boundary string). You can probably recognize most of these fields as they match some of the fields we have already seen in the previous pre-signed URL examples:
- Key
- Credentials
- Signature
We also have the full file content in the “file” field and a new additional field that contains the “policy” definition.
POST Method policy
The policy field is defined as a JSON object (encoded in Base64). It defines the upload rules (conditions) and the expiration date of the pre-signed request.
The main conceptual difference in the security model when comparing the PUT and the POST method is that, in the PUT method, we are signing the structure of the entire request (bucket name, key, headers, etc), while in the POST approach, we are only signing the policy.
By signing the policy you cannot alter the constraints, but you can have more freedom on how the request is composed (e.g. by specifying a different Content-Type after the user selects the file).
To better appreciate this idea, let’s see an example of policy (after Base64 decode):
{
  "expiration": "2022-11-15T20:46:37Z",
  "conditions": [
    ["content-length-range", 0, 5242880],
    ["starts-with", "$Content-Type", "image/"],
    {"bucket": "somebucket"},
    {"X-Amz-Algorithm": "AWS4-HMAC-SHA256"},
    {"X-Amz-Credential": "AKIA3SGABCDXXXA6KKA6/20221115/eu-west-1/s3/aws4_request"},
    {"X-Amz-Date": "20221115T194637Z"},
    {"key": "picture.jpg"}
  ]
}
It’s a JSON object with 2 main properties: expiration (the expiration timestamp) and conditions.
The conditions property contains an array of validation rules that will be used when a request is made to decide whether it is acceptable or not.
There is a very specific syntax that can be used to express different types of rules (perfect match, prefix, range, etc). You can check out the official documentation if you are curious to understand the details more in-depth.
Using the SDK (we will see an example later in this post) makes creating the policies much easier.
Also in this example, you can see how to limit the content length to a given range (from 0 to 5Mb) and how to support different image types.
Limitations and quirks
Although the POST method is very flexible (at least compared to the PUT method) it is not free from limitations or unexpected quirks.
For example:
- If you want to submit a web form using JavaScript (AJAX) you will need to enable CORS on the bucket (more on this later).
- You can upload only 1 file at a time (although the multipart/form-data encoding can support multiple files)
- The file field must be the last field in the list (if another field comes next it will simply be ignored, which is something that might create unexpected failures)
Some of these limitations and quirks become less relevant when using the SDK, but they are worth calling out anyway to avoid unexpected surprises that might be very hard to debug.
Should I use PUT or POST?
Whether you should use PUT or POST is more of a tradeoff between simplicity and features. In short:
- PUT is much simpler but more limited
- POST is slightly more complicated (and definitely less adopted) but it’s more flexible
- If you want to have flexibility on what can be uploaded or if you need to limit the file size within a certain range, you should learn POST and use it.
Other URLs
It’s worth mentioning that S3 pre-signed URLs are not limited to GET, PUT, or POST operations.
You can literally create pre-signed URLs for any command, including DeleteObject, ListBuckets, MultiPartUpload, etc.
The only annoying bit is that some of these APIs will return their response in XML, so you’ll need to deal with that kind of output.
How to create pre-signed URLs with the JavaScript SDK
In this section, we will present some code snippets to see how to use pre-signed URLs programmatically with the AWS JavaScript SDK.
Get object
The following code snippet illustrates how it is possible to generate a pre-signed URL using the AWS JavaScript SDK version 3.
import { S3Client, GetObjectCommand } from '@aws-sdk/client-s3'
import { getSignedUrl } from '@aws-sdk/s3-request-presigner'

const s3Client = new S3Client()
const command = new GetObjectCommand({
  Bucket: "some-bucket",
  Key: "some-object"
})

const preSignedUrl = await getSignedUrl(s3Client, command, {
  expiresIn: 3600
})

console.log(preSignedUrl)
The new JavaScript SDK is very modular and in this case we need to install 2 different packages:
- @aws-sdk/client-s3: generic S3 client library
- @aws-sdk/s3-request-presigner: specific library with the necessary signing algorithms needed to generate pre-signed URLs.
Once these libraries are installed, these are, at a high level, the steps that need to be performed:
- Instantiate a new S3 Client
- Define a GetObject command specifying the name of the bucket and the key for which we want to authorize the download
- Use the client and the command to get a signed URL. Optionally you can specify an expiry in seconds.
Put Object
The following code illustrates how to generate a pre-signed URL for a put object operation:
import { S3Client, GetObjectCommand } from '@aws-sdk/client-s3'
import { getSignedUrl } from '@aws-sdk/s3-request-presigner'

const s3Client = new S3Client()
const command = new PutObjectCommand({
  Bucket: "some-bucket",
  Key: "some-object"
})

const preSignedUrl = await getSignedUrl(s3Client, command, {
  expiresIn: 3600
})

console.log(preSignedUrl)
Compared to the previous example there isn’t really much to add. This code is almost identical. The only difference is that this time we are using a PutObjectCommand, rather than a GetObjectCommand.
POST object
This is probably the most interesting example. How to use the AWS SKD for JavaScript (v3) to perform a pre-signed POST request to S3:
import { S3Client } from '@aws-sdk/client-s3'
import { createPresignedPost } from '@aws-sdk/s3-presigned-post'

const { BUCKET_NAME, OBJECT_KEY } = process.env
const s3Client = new S3Client()

const { url, fields } = await createPresignedPost(s3Client, {
  Bucket: 'somebucket',
  Key: 'someobject',
  Conditions: [
    ['content-length-range', 0, 5 * 1024 * 1024] // 5 MB max
  ],
  Fields: {
    success_action_status: '201',
    'Content-Type': 'image/png'
  },
  Expires: 3600
})

console.log({ url, fields })
The first thing to note is that we need a new library (@aws-sdk/s3-presigned-post) which is the one that allows us to create a pre-signed POST request.
This library gives us a function called createPresignedPost which receives an S3 client instance and a number of configuration options:
- Bucket: the name of the bucket on which to perform the upload.
- Key: the object name.
- Conditions: the array of conditions for validation (in this case we are defining that the payload size can vary between 0 and 5Mb).
- Fields: represents values we want to pre-populate in the generated web form. Some of these can be used to provide additional configuration information, for instance, what’s the status code that S3 should return in case of success. We could also specify a URL on which the user should be redirected in case of a successful upload (that could be a custom thank you page).
- Expires: after how many seconds the pre-signed POST should expire?
You might have noticed that this function returns 2 things: a URL and a set of fields. What can we do with those?
We could use them to generate a web form:
If we put this code on a web page and render it with a browser we should see something like this:
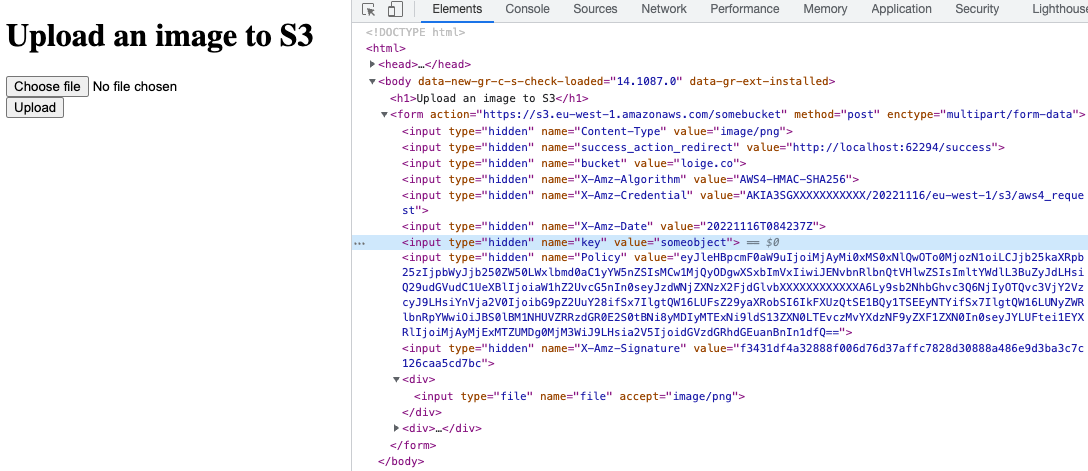
This is a fully functional web form that can be used to allow a user to upload a file to an S3 bucket using nothing else than a web browser.
More code examples
If you are looking for additional code examples you can check out the following repository: https://github.com/lmammino/s3-presigned-urls-examples.
Worth mentioning is that you can use the pre-signed POST method in combination with JavaScript to make your uploads even more dynamic (for instance you could set the Contet-Type dynamically based on the actual file that the user selected in the browser).Check out the post-form-ajax.js example if you want to learn more about this use case.
CORS and using pre-signed URLs in the browser
When using JavaScript to control the submission of a pre-signed POST form, there’s an additional piece of complexity to keep in mind: CORS (Cross-Origin Resource Sharing).
This is a security mechanism that browsers use to avoid websites from arbitrarily sending user data to third parties.
When you are working on a website for example running on example.com you cannot simply make an HTTP request from JavaScript to S3, so if you try to do that you will see an error such as the following:
Access to fetch at ‘https://s3.eu-west-1.amazonaws.com/somebucket’ from origin ‘https://example.com’ has been blocked by CORS policy: No ‘Access-Control-Allow-Origin’ header is present on the requested resource. If an opaque response serves your needs, set the request’s mode to ‘no-cors’ to fetch the resource with CORS disabled.
The way we can tell our browser that is OK for example.com to talk to S3 is by configuring our S3 bucket to send proper CORS headers.
This is something that can be done by specifying the following CORS configuration in your bucket (yes, this needs to be done for every bucket that you want to reach from your frontends using JavaScript):
[
    {
        "AllowedHeaders": [
            "*"
        ],
        "AllowedMethods": [
            "GET",
            "HEAD",
            "PUT",
            "POST",
            "DELETE"
        ],
        "AllowedOrigins": [
            "example.com"
        ],
        "ExposeHeaders": [
            "x-amz-server-side-encryption",
            "x-amz-request-id",
            "x-amz-id-2",
            "ETag"
        ],
        "MaxAgeSeconds": 3000
    }
]
Note that the field AllowedOrigins contains only “example.com”. If your bucket needs to support multiple websites, you can add them to the list (e.g. “example2.com” or “subdomain.example.com”) or specify a generic catch-all “*” which will make the bucket reachable from every website. Although using “*” is very common is not a great security practice as it will allow any websites (including ones you don’t control) to send requests to your bucket, so you probably want to be more restrictive here.
Revoking pre-signed URLs
There is no practical way to revoke individual pre-signed URLs once they are generated and shared.
We mentioned that a user can keep using that URL multiple times until it expires. We also mentioned that AWS will check if the credentials used to generate the pre-signed URL are still valid, and, if they aren’t the URL is considered invalid as well.
One might think to invalidate credentials every time we want to invalidate a given URL. Although this works it is highly impractical because it will invalidate all pre-signed URLs generated with the same credentials.
Using short expiration times is probably the best approach here, but you need to evaluate what’s the definition of “short” in the context of your application. If you are sending a link by email, you need to take into account that it might take several hours (if not days) before the user notices the email and clicks on the link.
Alternative solutions
Pre-signed URLs are not the only options. For instance, it is not uncommon for some frontend applications to embed the entire AWS JavaScript SDK client and get credentials using an identity service like Cognito. In this scenario you could use the SDK client-side to interact with S3 directly, so you don’t need to rely on pre-signed URLs.AWS Amplify is a tool you can use to simplify the setup for this kind of architecture.
Wrapping up
Thanks for making it so far in the article… I know, it was a long one, but you did it so well done to you! ✌️
In summary:
- S3 pre-signed URLs are a great way to authorize operation on S3.
- They are generally used to implement upload and download functionality.
- The signature is created client-side, so you can sign anything (even actions you don’t even have the right to perform).
- AWS will validate at request time whether the request itself is still valid and not forged, but also that the credentials used for signing the request are actually authorized to perform the given action.
- There are two different methods to perform uploads: PUT and POST. POST is more complex but also much more flexible. POST is less used in the wild, but you should consider using it!
- Pre-signed URLs are not the only option and they come with their own set of tradeoffs. Always evaluate what’s the best solution for the problem at hand.
Let us know if you are planning to use pre-signed URLs and what’s your use case.
If you need help with your AWS projects, don’t hesitate to reach out to us, we’d love to help!