

In this article, we will show you how to get started quickly with a very simple CRUD application using a managed GraphQL API backend. There is a full code example, explained step-by-step. This is aimed at anyone learning GraphQL and AppSync for the first time.
I have provided the code examples used in this guide in a GitHub repository. Feel free to check it out and contribute any changes!
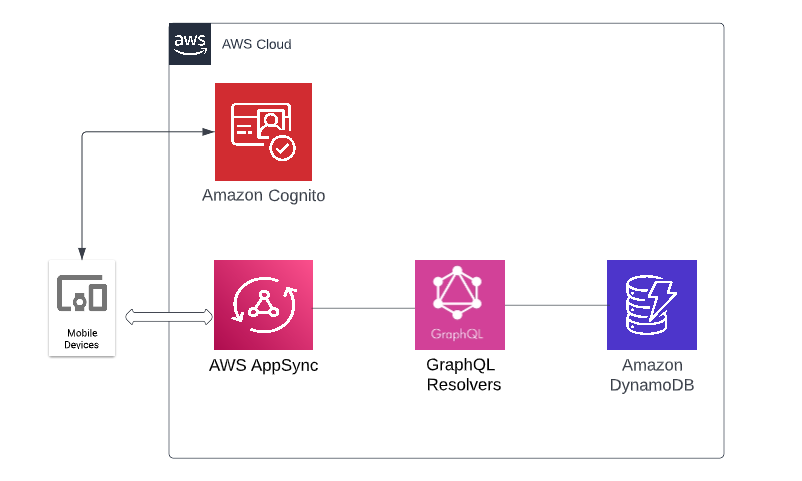
Application Architecture
Why GraphQL?
GraphQL is a query language for APIs and a runtime for fulfilling those queries with your data. Every GraphQL API has a schema. A GraphQL Schema is a core concept where we define CRUD (Create, Read, Update and Delete) operations. A GraphQL schema can define:
- Queries for reading data
- Mutations for creating and updating data
- Subscriptions for notifications and they are related to Mutations. To define which mutations trigger which subscriptions, we need to add a directive in the schema.
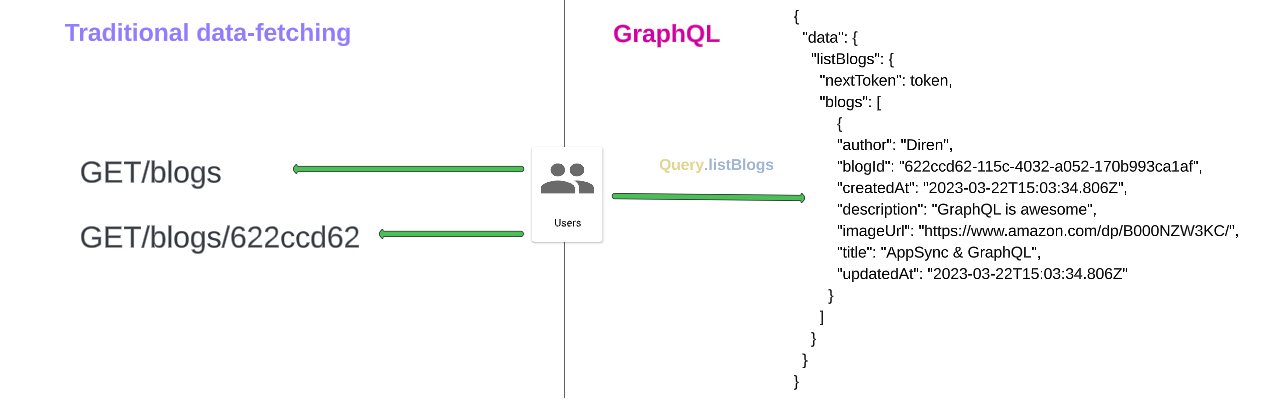
With GraphQL we can access many different types of data from a single endpoint, making it easier for applications to get exactly the data they need in a single request. This makes it more compelling to use instead of a REST API. With a REST API, we would typically gather the data by accessing multiple endpoints. This can cause over/under fetching data, where an endpoint returns either a lot of data that we don’t need or it yields a response missing data we actually need. GraphQL prioritizes giving clients exactly the data they request and no more.
GraphQL was developed by Facebook, which first began using it for mobile applications in 2012. The GraphQL specification was open sourced in 2015. It is now overseen by the GraphQL Foundation. GraphQL was invented during the move from Facebook’s HTML5-driven mobile applications to purely native applications. It is a query language for graph data that powers the lion’s share of interactions in the Facebook Android and iOS applications.
The developers at Facebook were finding it difficult to implement the News Feed section for their IOS application. During their development phase, they experienced a lot of bugs because there was no convention regarding the exchange of data between the front-ends and the back-ends. The shape of the data assumed by the front-end was different from the one being sent by the back-end APIs. There was a need to build something better!
Facebook solved this problem by building GraphQL. GraphQL is a static strong-typed query language that lets clients declaratively specify their data requirements. The clients specify the shape of the data that they need and the server responds back with the exact same data as the response. The client is in control of the view! This leads to fewer or no bugs.
What is AppSync?
AppSync is a fully managed AWS service based on GraphQL and is responsible for processing requests and mapping different parts of requests to different resolvers which are then responsible for fetching exact data from different data sources you have in your AWS environment.
The native data-source integrations provided with AppSync are:
- AWS Lambda functions: map a Lambda function to a GraphQL resolver.
DynamoDB tables: supply data from a DynamoDB table to the GraphQL API. - Amazon OpenSearch domains: use an OpenSearch domain as the data source for your GraphQL queries.
- AWS RDS: connect to SQL database instances available within RDS, and use databases and tables from that service as data sources.
Since AppSync integrates with AWS Lambda, RDS, and DynamoDB, chances are you won’t need to write custom code to connect to your databases. This speeds up development for your teams using AppSync, allowing them to focus more on business logic and less on connection layers for the underlying services.
AppSync also supports a number of authentication integrations:
- AWS Cognito User Pools: implement an authentication and authorization mechanism for your GraphQL API in AppSync.
- AWS IAM: manage API access by creating IAM users.
- OpenID Connect (OIDC): authenticate API users using the OpenID identity service.
In addition to these integrations, many other integrations are possible by implementing them within an AWS Lambda function and using Lambda’s own integration to connect to it from AppSync.
GraphQL APIs are a popular choice when building Serverless-powered web applications. In particular, many Serverless applications that provide a GraphQL API rely on AWS AppSync to manage their API schemas and orchestrate their resolvers and data sources. Choosing AppSync usually means lower cost thanks to its pay-per-use model, high scalability, and reduced development time when building GraphQL APIs.
Using AppSync allows for GraphQL subscriptions, which are a great way to build applications that always present the most up-to-date state of the data. When using AppSync with the Amplify framework, you can combine subscriptions with offline functionality to create auto-updating web and mobile apps that can correctly handle unstable mobile network connections without much additional work.
Getting Started
We will be creating an API to create and manage blog posts and we will keep it super simple to get familiar with AppSync in a very simple way.
Prerequisites, in this example we are going to use the Serverless Framework v3. Node v12 or later should be installed locally. And for the AppSync plugin, we are using v1.14.0.
First, we’ll need to create a directory for our project.
mkdir appsync-quick-startGo into the directory and run npm init to create an empty Node.js project with a package.json.
cd appsync-quick-startnpm initThen run sls create –template aws-nodejs to initialise the Serverless Framework’s default configuration. (Feel free to use a language which you feel comfortable with. Available templates can be seen by running the sls create –help command). This command will create a boilerplate for a Node.js serverless project which contains:
- serverless.yml, which is the main configuration file for the project. We will customize it and add additional resources.
- .npmignore
- handler.js, containing example code for a Lambda function. We don’t need this so you can delete it
As we are creating a blogging platform, we want to create a table which stores the blogs. We call this table BlogsTable and declare it under the resources/Resources section in the serverless.yml file.
   BlogsTable:
      Type: AWS::DynamoDB::Table
      Properties:
        BillingMode: PAY_PER_REQUEST
        KeySchema:
          - AttributeName: blogId
            KeyType: HASH
        AttributeDefinitions:
          - AttributeName: blogId
            AttributeType: S
        Tags:
          - Key: Name
            Value: blogs-table
We will use a Cognito User Pool as our Identity Provider, so we can store user data and allow users to log in and make secure requests to our API. If you want to integrate to a different identity provider, there are other options which you can read about here: https://docs.aws.amazon.com/appsync/latest/devguide/security-authz.html.
For our purposes, we will need groups of users. The first is our admin users who can create and read blogs. We also want to create a readers group who can only read blogs. We can manage these permissions depending on the Cognito User Pool Group’s IAM role which we also configure in serverless.yml. Just like our DynamoDB table, we can put this code in serverless.yml under the resources/Resources section.
   CognitoUserPool:
      Type: AWS::Cognito::UserPool
      Properties:
        AutoVerifiedAttributes:
          - email
        Policies:
          PasswordPolicy:
            MinimumLength: 8
            RequireLowercase: false
            RequireNumbers: false
            RequireUppercase: false
            RequireSymbols: false
        UsernameAttributes:
          - email
        Schema:
          - AttributeDataType: String
            Name: name
            Required: false
            Mutable: true
        UserPoolName: BlogPostUserPool

    CognitoUserPoolClient:
      Type: AWS::Cognito::UserPoolClient
      Properties:
        UserPoolId: !Ref CognitoUserPool
        ClientName: web
        ExplicitAuthFlows:
          - ALLOW_USER_SRP_AUTH
          - ALLOW_USER_PASSWORD_AUTH
          - ALLOW_REFRESH_TOKEN_AUTH
        PreventUserExistenceErrors: ENABLED
The following code will create the admin group and permissions for admins in the Cognito User Pool.
# Cognito Admin group for the users pool
    CognitoAdminGroup:
      Type: AWS::Cognito::UserPoolGroup
      Properties:
        UserPoolId: !Ref CognitoUserPool
        GroupName: Admin
        RoleArn: !GetAtt CognitoAdminIAMrole.Arn
        Description: "Admin users belong to this group"

    # Cognito Admin IAM role
    CognitoAdminIAMrole:
      Type: AWS::IAM::Role
      Properties:
        AssumeRolePolicyDocument:
          Version: "2012-10-17"
          Statement:
            - Effect: "Allow"
              Principal:
                Federated:
                  - "cognito-identity.amazonaws.com"
              Action:
                - "sts:AssumeRoleWithWebIdentity"
        Policies:
          - PolicyName: "blogpost-admin-group-policy"
            PolicyDocument:
              Version: "2012-10-17"
              Statement:
                - Effect: "Allow"
                  Action:
                    - "dynamodb:PutItem"
                    - "dynamodb:GetItem"
                    - "dynamodb:Query"
                    - "dynamodb:BatchGetItem"
                  Resource:
                    - !GetAtt BlogsTable.Arn
        RoleName: "blogpost-admin-role"
The following code will create the reader group and permissions for readers in the Cognito User Pool.
CognitoReaderGroup:
      Type: AWS::Cognito::UserPoolGroup
      Properties:
        UserPoolId: !Ref CognitoUserPool
        GroupName: Reader
        RoleArn: !GetAtt CognitoReaderIAMrole.Arn
        Description: "Reader belongs to this group"

    # Cognito Reader IAM role
    CognitoReaderIAMrole:
      Type: AWS::IAM::Role
      Properties:
        AssumeRolePolicyDocument:
          Version: "2012-10-17"
          Statement:
            - Effect: "Allow"
              Principal:
                Federated:
                  - "cognito-identity.amazonaws.com"
              Action:
                - "sts:AssumeRoleWithWebIdentity"
        Description: "This is the IAM role for reader group"
        Policies:
          - PolicyName: "blogpost-reader-group-policy"
            PolicyDocument:
              Version: "2012-10-17"
              Statement:
                - Effect: "Allow"
                  Action:
                    - "dynamodb:GetItem"
                    - "dynamodb:Query"
                    - "dynamodb:BatchGetItem"
                  Resource:
                    - !GetAtt BlogsTable.Arn
        RoleName: "blogpost-reader-role"
Now, let’s set up a region which is the closest to your area in serverless.yml to avoid having region conflict as a default of the serverless framework is us-east-1.
provider:
  name: aws
  region: eu-west-1
  stage: dev
  endpointType: REGIONAL
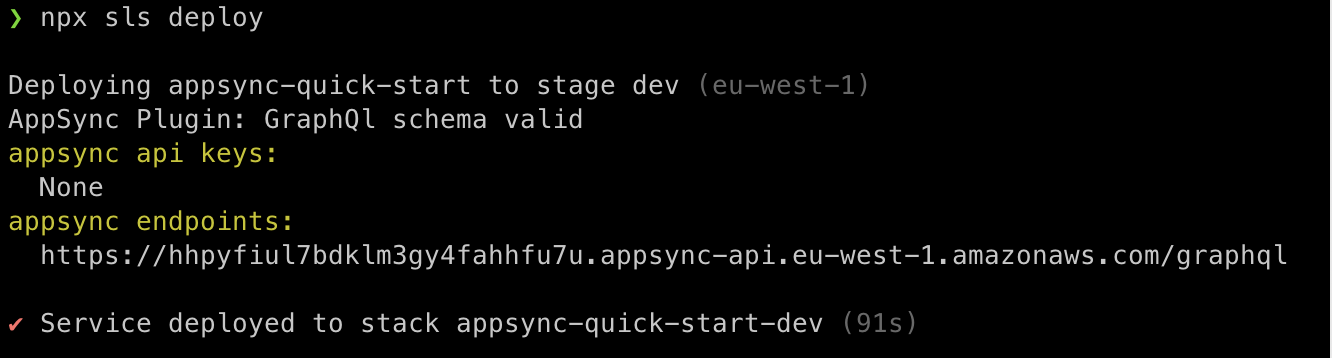
After setting up your AWS credentials, you are ready to deploy everything we have declared so far. Let’s run:
npx sls deploy
It is time to design the GraphQL schema containing our Queries, Mutation and Subscription.
- We created a file called schema.api.graphql in the root directory of the project with the following contents.
- We provided two Queries are getBlogById and listBlogs, one Mutation is createBlog, and Subscription is onCreateBlog.
- Query.listBlogs and Query.getBlogById are for getting data from the API.
- Mutation.createBlog is for changing data via the API.
- Subscription.onCreateBlog is for long-lived connections for streaming data from the API.
Schema {
query: Query
mutation: Mutation,
subscription: Subscription
}
type Query {
getBlogById(blogId: ID!): Blog!
listBlogs(limit: Int!, nextToken: String): BlogsPage!
}
type BlogsPage {
blogs: [Blog]
nextToken: String
}
type Blog {
blogId: ID!
title: String!
description: String
imageUrl: AWSURL
author: String
createdAt: AWSDateTime!
updatedAt: AWSDateTime!
}
type Mutation {
createBlog(newBlog: BlogInput): Blog! @aws_auth(cognito_groups: ["Admin"])
}
input BlogInput {
title: String!
description: String
imageUrl: AWSURL
author: String!
}
type Subscription {
onCreateBlog: Blog @aws_subscribe(mutations: ["createBlog"])
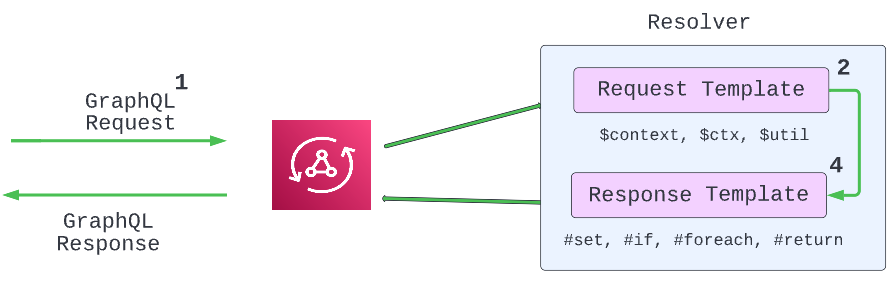
}Now that we have created a schema, we need to link these operations to DynamoDB, which is our data source. This is done using a Resolver. It is important to know the difference between a resolver and a data source. A Resolver in AppSync is composed of:
- Data Source: As explained above, AppSync supports multiple data sources.
- Request Template: This is where we can change the default behavior to add authorisation or input validation. We can also map the structure of the GraphQL request to the syntax required by the data source.
- Response Template: This is where we can add custom error handling or result transformations. The output will be the JSON response back to the client.
We have an option to create AppSync resources explicitly like we did for the Table and UserPool but this process is made simpler for us by the Serverless AppSync plugin. To install it, run:
npm i –save-dev serverless-appsync-plugin@1.14.0We also have to add serverless-appsync-plugin in the plugins section in serverless.yml
plugins:
  - serverless-appsync-plugin
You will see on the AWS console the Cloudformation stack created. And in the stack, you will see the created resources which are the DynamoDB Table and the Cognito User Pool.
![]()
Creating your first GraphQL API
We can then declare this plugin’s configuration under the custom section of serverless.yml. This is where we configure the AppSync API, data source and resolvers.
custom:
  appSync:
    - name: appsync-quick-start
      schema: schema.api.graphql
      authenticationType: AMAZON_COGNITO_USER_POOLS
      userPoolConfig:
        awsRegion: eu-west-1
        defaultAction: ALLOW
        userPoolId: !Ref CognitoUserPool
      mappingTemplatesLocation: mapping-templates
      mappingTemplates:
        - type: Query
          field: getBlogById
          dataSource: blogsTable
        - type: Query
          field: listBlogs
          dataSource: blogsTable
        - type: Mutation
          field: createBlog
          dataSource: blogsTable

      dataSources:
        - type: AMAZON_DYNAMODB
          name: blogsTable
          config:
            tableName: !Ref BlogsTable
Let’s explain the various sections of this plugin’s configuration.
- We specify that we are using Cognito User Pools for authorisation
- We define our GraphQL resolvers by configuring mapping templates which link our data source (DynamoDB) to the Query declared already in our GraphQL schema. This is all under the mappingTemplates section. Later on, we will write templates that define the request and response syntax for each of these queries. For example, we have 2 Queries and 1 Mutation so we should specify them separately and then add the request and response templates. We need to specify the data source for each of these resolvers. There are 5 data sources which AppSync supports. These are DynamoDB, Lambda, RDS (Aurora/MySQL), HTTP, and ElasticSearch. In this project, we are only using DynamoDB because we only have 1 table which is BlogsTable.
- The location for these mapping templates is defined by mappingTemplatesLocation. In our example, we will store our templates in the mapping-templates folder.
Mapping Requests and Responses
For every request type and field combination declared in our mappingTemplates, create a request and response template with the file name {type}.{field}.request and {type}.{field}response.vtl.
These templates use a file format called Velocity Templates. Velocity is a Java-based template engine, to render its templates. The Velocity Engine is responsible to execute these templates and generate the corresponding output. Velocity Templates are written in VTL (Velocity Template Language). For AppSync use-cases the Resolver Mapping Template reference is key, as it details the helpers available to you, and the various service-specific. We are using VTL to dynamically change the Resolver behavior depending on the Request Context.
When writing VTL templates under the mapping-templates directory we can use helper functions like util, context, etc. to reduce the amount of code we write. For example, the helper function $util.dynamodb can convert JSON object notation to the structure DynamoDB can understand. See here for further details on DynamoDB helpers.
1. The getBlogById GraphQL query is reading a single blog post using the blogId. This is achieved by mapping the GraphQL request to a DynamoDB GetItem call, using the blogId identifier as the lookup key. We create this query in the Query.getBlogById.request.vtl request template by using GetItem request mapping document.
{
  "version" : "2018-05-29",
  "operation" : "GetItem",
  "key" : {
    "blogId" : $util.dynamodb.toDynamoDBJson($context.arguments.blogId)
  }
}
For the response template in Query.getBlogById.response.vtl, we expect the blog to be returned. The value of $ctx.result (or $context.result) will contain the response from DynamoDB. We also need to convert this to JSON. For that, we need another helper function: $util.toJson($ctx.result)
$util.toJson($context.result)2. The listBlogs GraphQL query is reading all blog posts by using limit and nextToken. This is achieved by mapping the GraphQL request to a DynamoDB Scan call, using the limit to evaluate at a single time the maximum number of items and nextToken which allow us to use the pagination token to continue a previous query. We create this query in the Query.listBlogs.request.vtl request template by mapping to the DynamoDB Scan API. Scan is one of the three ways of getting the data from DynamoDB, and it is the most brutal one because it grabs everything. Scan operation “scans” through the whole table, returning a collection of items and their attributes. Scans are expensive, slow, and against best practices. In order to fetch one item by key, you should use Get operation, and if you need to fetch a collection of items, you should do that using Query. But Scan is okay for a small DB in this simple example.
{
  "version" : "2018-05-29",
  "operation" : "Scan",
  "limit" : $util.toJson($context.arguments.limit),
  "nextToken" : $util.toJson($context.arguments.nextToken)
}
For the response template, the file named Query.listBlogs.response.vtl we expect all the blogs to be returned depending on the limit we define. We also expect to retrieve the pagination token to continue in a subsequent query if there is more data.
{
  "blogs" : $util.toJson($context.result.items),
  "nextToken": $util.toJson($util.defaultIfNullOrBlank($context.result.nextToken, null))
}
3. The createBlog GraphQL query is creating a new single blog post providing a title, description, imageUrl, author. This is achieved by mapping the GraphQL request to a DynamoDB PutItem call, giving the blogId identifier as the unique key. We will provide attribute values for title, description, imageUrl and author, as well as timestamps in the createdAt and updatedAt values. We create this query in the Mutation.createBlog.request.vtl request template by using PutItem API
{
    "version" : "2018-05-29",
    "operation" : "PutItem",
    "key": {
        "blogId" : $util.dynamodb.toDynamoDBJson($util.autoId())
    },
    "attributeValues" : {
        "title" : $util.dynamodb.toDynamoDBJson($context.arguments.newBlog.title),
        "description" : $util.dynamodb.toDynamoDBJson($context.arguments.newBlog.description),
        "imageUrl" : $util.dynamodb.toDynamoDBJson($context.arguments.newBlog.imageUrl),
        "author" : $util.dynamodb.toDynamoDBJson($context.arguments.newBlog.author),
        "createdAt": $util.dynamodb.toDynamoDBJson($util.time.nowISO8601()),
        "updatedAt": $util.dynamodb.toDynamoDBJson($util.time.nowISO8601())
    }
}
For the response template, the file named Mutation.createBlog.response.vtl we expect the new blog post in return.
$util.toJson($context.result)- After configuring all resolvers, we are ready to deploy the project.
- For deployment, we will follow the same steps as before.
Now, we are ready to create and read some blog posts! First, create an admin and a reader user in the Cognito User Pool.
You can create admin and reader users on the AWS Cognito console and also by using AWS CLI. When you go to the AWS Cognito console you already have the two groups named as Admin and Reader as we just created these groups in serverless.yml.
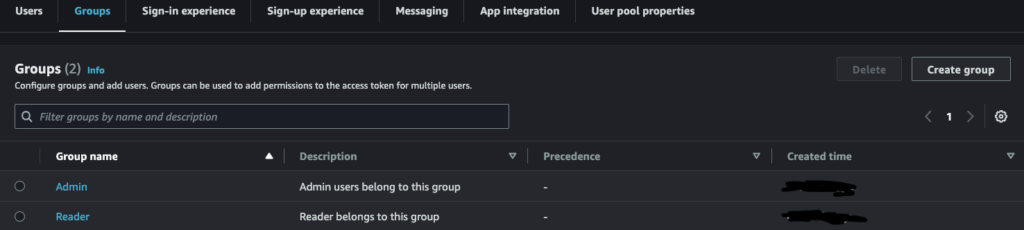
We expect you to have a level of experience with the AWS Cognito as our purpose is not here to demonstrate all the steps with all services we are using. However for the sake of simplicity for followers who are very new to AWS, we will share the steps that you can follow on the AWS Cognito console. Remember this is not best practice. We normally treat the console as read only and manage these steps using AWS CLI.
You have the Admin and Reader groups and let’s add an admin user to the Admin group.
- Go to AWS Cognito console.
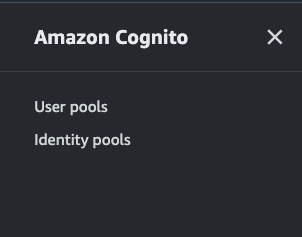
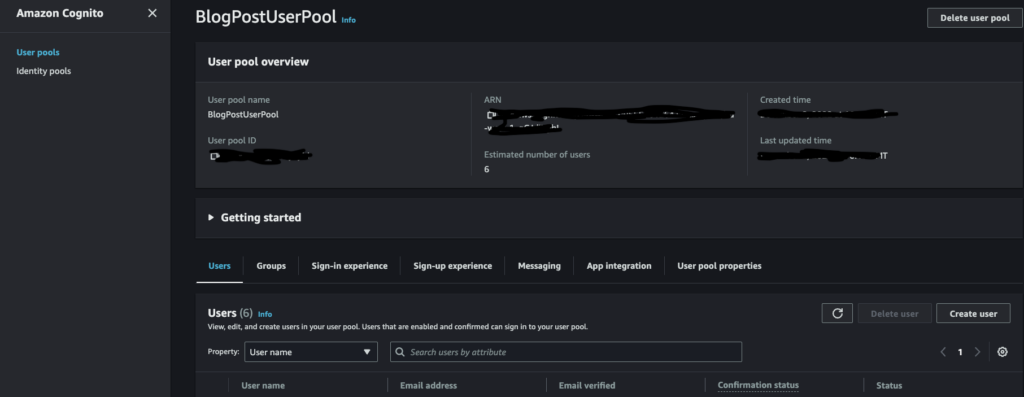
- Click User pools and you will see the BlogPostUserPool.

- Click the BlogPostUserPool. And Let’s create our very first admin user by clicking Create user.
- We are nearly there!
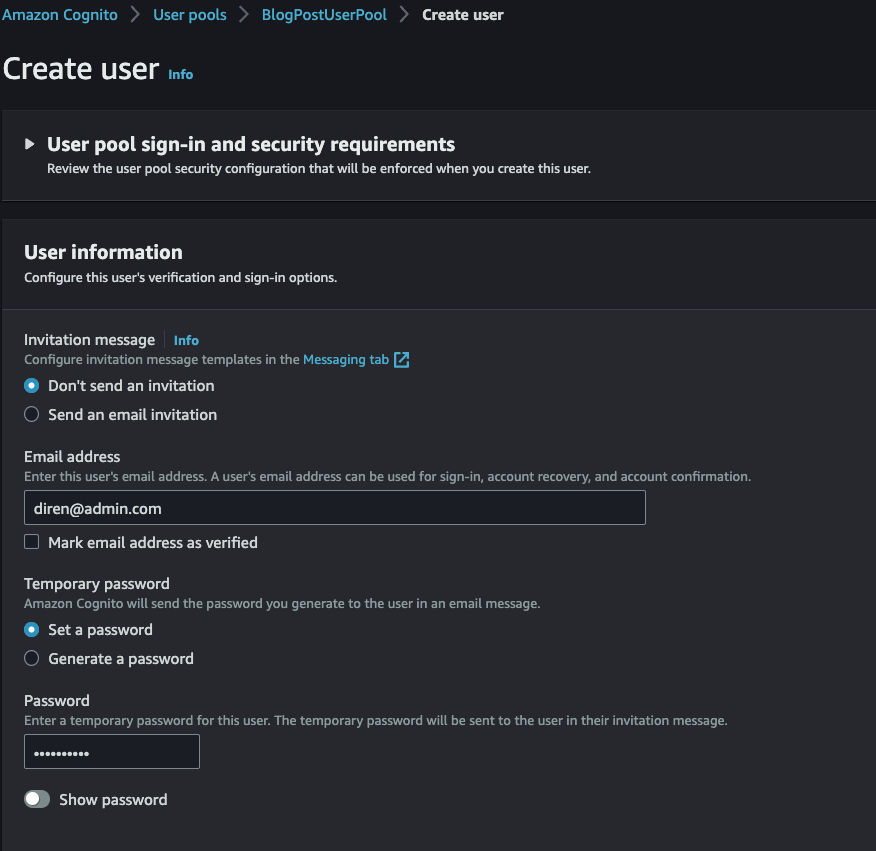
- Let’s login via AWS Cognito to AWS AppSync to make GraphQL queries.
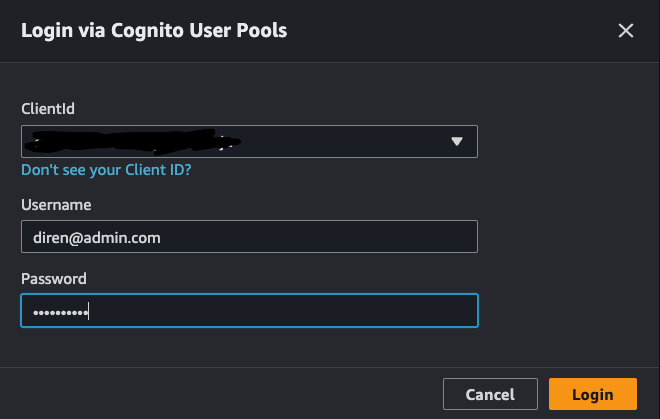
- Here the users are created in a “Force Change Password” state and we need to change the password.

Creating Blog Posts
We have followed all the steps. And, now this is the time to have some fun! We are now ready to make some GraphQL queries!!
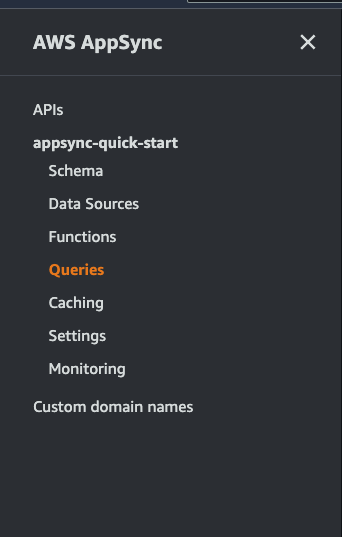
On the AppSync console, you will see the name of the AppSync API that we defined. And this AppSync API contains the sections for Schema, Data Sources, Functions, Queries, Caching, Setting and Monitoring. Feel free to click each section and familiarize yourself with all the features on the AppSync console. Our focus will be on the Queries section, where we will first log in with the Cognito User Pool and then do queries, mutations, and subscriptions.
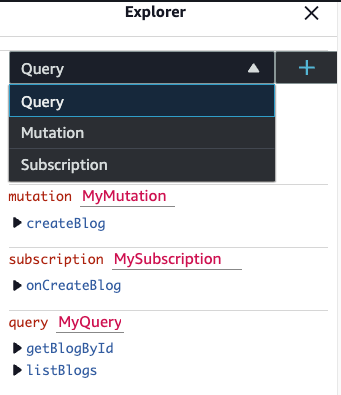
The AppSync console shows our two queries, getBlogById and listBlogs. We can also see the createBlog Mutation and the onCreateBlog Subscription.
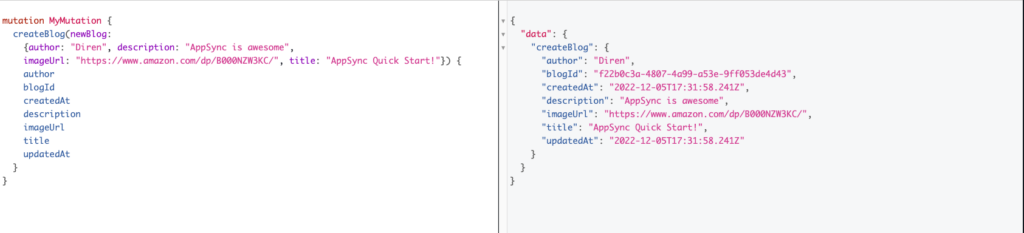
Let’s create our first blog post!
- Create a blog
mutation MyMutation {
  createBlog(newBlog:
    {author: "Diren", description: "AppSync is awesome",
    imageUrl: "https://www.amazon.com/dp/B000NZW3KC/" title: "AppSync & GraphQL"}) {
    author
    blogId
    description
    title
    createdAt
    updatedAt
    imageUrl
  }
}
- Let’s execute the getBlogById Query using the returned ID of the blog post we just created
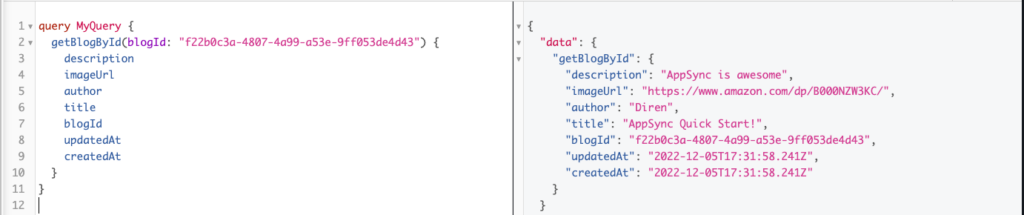
- Let’s do list Blogs and see how pagination works
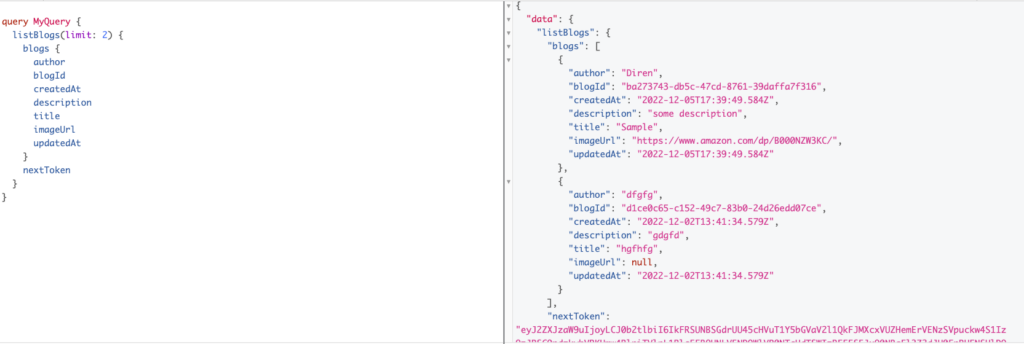
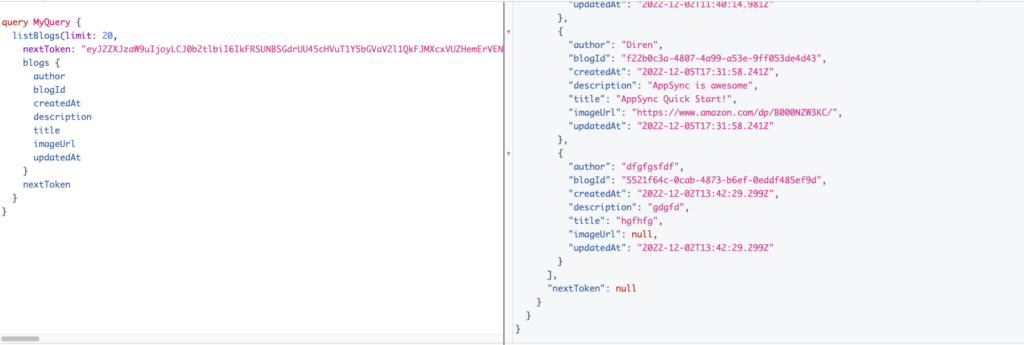
- After pasting nextToken we can still query data if there is one.
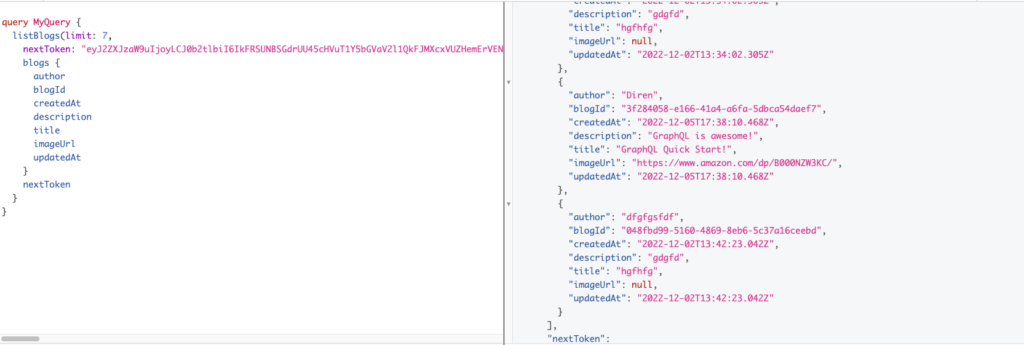
- When all data has been fetched, the value of nextToken will be null.
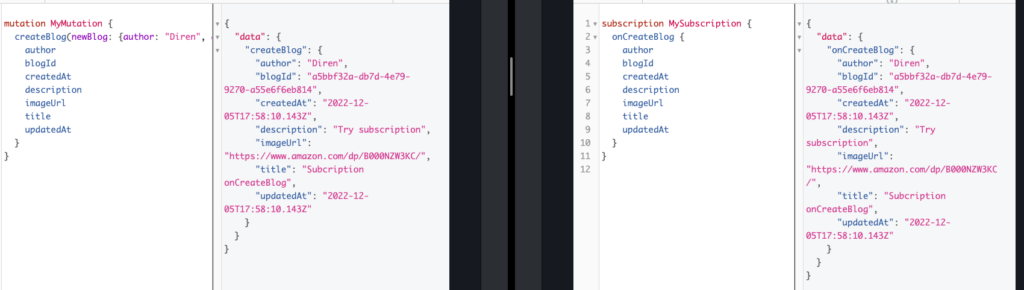
- Let’s do a subscription when we create a blog we want to see in real-time. Subscriptions are a GraphQL feature allowing the server to send data to its clients when a specific event happens. Subscriptions are usually implemented with WebSockets, where the server holds a steady connection to the client. This means when working with subscriptions, we’re breaking the Request-Response cycle that is typically used for interactions with the API. Instead, the client now initiates a steady connection with the server by specifying which event it is interested in. Every time this particular event then happens, the server uses the connection to push the expected data to the client.
- We can provide any data source (DynamoDB, Lambda, RDS (Aurora/MySQL), HTTP Endpoint, and ElasticSearch) in AWS AppSync real-time by creating a subscription on a Mutation.
- Create a subscription on createBlog mutation, so all the connected blog live users who are using the web app or mobile app will receive a real time notification when a blog admin adds a new blog to the blog page. In this example we haven’t built a web app or mobile app yet so we provide the example from the AWS AppSync console.
- On the AWS AppSync console keep running the Subscription Query then go to Mutation Query to create a blog you will see the blog that you created will be displaying on Subscription Query in real-time.
Summary
So far, we have:
- Created a brand new serverless template.
- Created a DynamoDB Table as a resource to store the blog posts.
- Created a Cognito User Pool for authorization and defined two groups; one of them for admin users and the other for reader users.
- Created a GraphQL schema which contains 2 Queries (getBlogById and listBlogs), 1 Mutation (createBlog), and a Subscription (onCreateBlog).
- Implemented the Serverless AppSync plugin into the project.
- Configured all the resources for the AppSync plugin.
- And we were ready to do queries on the AWS AppSync console.
Next Steps?
This guide has shown you how to start developing and defining the API schemas.
The next step would be to integrate this back end project with a front end. AWS Amplify can be used in combination with AWS AppSync to generate the resources required for the front end applications.
Some links to help you to get starts with your front end app using back end AppSync API are:
- You can connect your back end AppSync API to the front end by following steps in this AWS Amplify documentation link
- https://mokkapps.de/blog/build-and-deploy-a-serverless-graphql-react-app-using-aws-amplify/
- https://articles.alfa1.com/using-aws-appsync-and-amplify-in-your-development-process
- https://gerard-sans.medium.com/create-a-cloud-enabled-graphql-api-with-aws-amplify-and-vue-99ec669d3bc5
Some additional projects designed to facilitate the adoption of GraphQL are:
- AppSync
- Apollo, a GraphQL platform that includes a frontend client library (Apollo Client) and backend server framework (Apollo Server).
- Offix, an offline client that allows GraphQL mutations and queries to execute even when an application is unreachable.
- Graphback, a command line-client for generating GraphQL-enabled Node.js servers.
- OpenAPI-to-GraphQL, a command-line interface and library for translating APIs described by OpenAPI Specifications or Swagger into GraphQL.